|
Site Navigation
NOC Home
Other links
SoC Homepage
MySoC Intranet
Student Intranet
Staff Intranet
NUS Homepage
About NOC Web
|
Setting up Shiva VPN Client
This information is obsolete. We are no longer operating
the ShivA VPN service.
Note: Intel has discontinued support
of the Shiva LanRover VPN Gateway used by SoC. While this Shiva VPN
continues to be available to users, you are encouraged to use NUS VPN
instead. Please check
http://www.nus.edu.sg/vpn for
more information. Where applicable, you may also want to try
SSH Tunneling instead, or the
Linux user-space VPN client.
More information about the Shiva VPN is
available. If you are new to SoC, check out the Net Start guide at
https://noc.comp.nus.edu.sg/netstart.
Prerequisites:
- The operating system must be either Window 95, 98, NT or 2000
- A TCP/IP network connection is already installed and configured. This
TCP/IP connection can be made via dialup, cable modem, or adsl modem.
1. Downloading and Installing the Client
- For Win95/8 users, please download the 3 diskette files here -
vc9567i1,
vc9567i2,
vc9567i3
For WinNT users, please download the 3 diskette files here -
vcnt67i1,
vcnt67i2,
vcnt67i3
For Win2000 users, please download -
shivavpn68-win2000.zip
- For Broadband (cable, adsl, spnp) users, you may download the full zip
file here -
ce9567.zip (95/8 version),
cent67.zip (NT version)
If you have downloaded the diskette version, execute the 3 files
you've downloaded. Each time the software will prompt you to
insert a diskette and it'll automatically create the diskettes for you.
After which you may proceed to run the setup.exe file in the 1st
diskette to install the client.

- If you have downloaded the zip version, unzip the file and run setup.exe
to install the client.
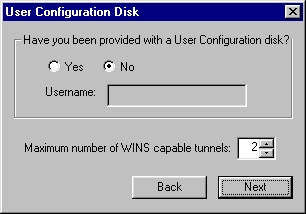
- During installation, the program will prompt you for a configuration disk,
select NO.
- It'll also ask you if you wish to start the client each time Windows
restart, select NO.

- After the installation has been completed, restart your Windows.
Page: 1,
2,
3
|