Dialup Configuration for Windows 2000
This information is now unmaintained. If you require any
assistance, please contact
Technical Services.
Configuration Procedures
- Click on the "Start" button, go to "Settings", followed by "Network and Dial-up
Connections."
- Double-click on "Make a new connection", this will launch the Network
Connection Wizard, click Next to continue.
- Check the first radio button "Dial-up to private network", click Next.

- Key in the dialup number in the space provided. Refer here for a list
of dialup numbers. Click Next.

- Select the appropriate option whether you want this connection to be
available to all users who login to your computer.

- Type in the name your want to use for this connection. If you want a
shortcut to this connection to appear on your desktop, click the checkbox
too. Click Finish. This will bring up the connection dialog box. Refer to
below.
Dialing in to SoC
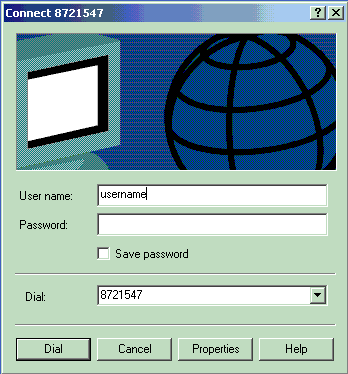
- You can bring up the dialup connection dialog box by navigating to
to the "Network and Dialup Connection" or by clicking the shortcut if
you've created it earlier. Key in your SoC username and password, click
"Dial" to initiate the connection. You will hear the modem handshaking
sound.
- When the
connection has been established, there will be a dialup icon at the lower
right hand side to indicate connectivity to the dialup server.
 Double-clicking it will bring up the connection status window. You can check your connection speed here.
If instead you hear a busy
tone, then all the lines are busy, perhaps you want to try another line.
Double-clicking it will bring up the connection status window. You can check your connection speed here.
If instead you hear a busy
tone, then all the lines are busy, perhaps you want to try another line.
- You are now connected to SoC dialup service. You can
then start your winsock application such as netscape, telnet or ftp.
Last Update: November 2001
|